Lazy Trader
STATUS canvas
How the STATUS canvas turns the current trading-plan state into one live panel that refreshes with the chart and explains what Lazy Trader is still waiting for.
Section video
STATUS canvas is the live summary of the current trade plan. It refreshes together with the chart and shows what the configuration is doing right now: which layers are already aligned, which ones are still pending, and which models are actually active.
Instead of cross-checking Direction, Start After, End At, Time, and Models manually, the status canvas keeps them in one operational view. That is especially useful in live work and in visual tester mode: the plan does not just expose the final state, it explains why the state is what it is.
Almost every block can be expanded, inspected in detail, and used to show or hide its conditions on the chart. That makes status a working control layer rather than a decorative summary.
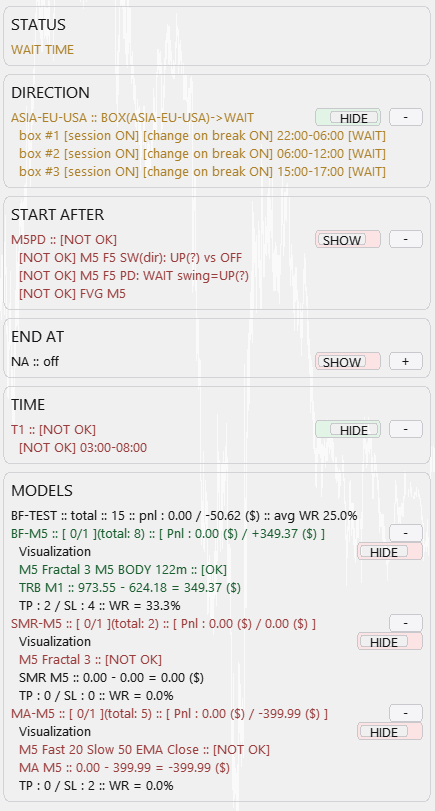
What the status canvas keeps in one place
- The current data coming from Direction, Start After, End At, Time, and Models.
- A clear label for what is selected in each section and which direction it is currently supporting.
- Which conditions are already satisfied and which ones are still blocking the scenario.
- The combined plan state: whether the setup can already search for entries, is actively running, or still has to wait.
What you can read about models directly in status
- Model visualization, baseline characteristics, and the direction in which the model is currently allowed to work.
- How many models are open simultaneously under this config, how many total openings it has produced, and the current plus combined PnL attached to it.
- What the model is seeing right now: projected entries under lows, inside BPR, around structure, and in other supported scenarios.
- If you add another model element and save it, it appears in status immediately with its own stats; structural models behave the same way and keep their own visualization and detail layer.
What expanded blocks let you inspect
- In Direction, multi-timeframe structure is easy to verify: once a new timeframe is added and saved, it appears in status immediately, and a toggle lets you show or hide both swing pairs on the chart.
- The same applies to Start After: for example, if the condition uses moving averages, status shows the active MA setup right away and lets you turn its chart display on or off.
- End At and Time also label the active condition, so you can see which stop rule or schedule filter currently controls the plan.
How status explains WAIT
If shorts are enabled in the plan but the model direction and/or Start After conditions are still not aligned, status does not hide that mismatch.
Instead, it switches to WAIT and tells you what is still missing, for example an MA flip or a structural-direction confirmation.
That is the real value of the status canvas: every part of the current trading plan stays visible and updates together with the chart.
Other Lazy Trader sections
Config Mode and Lazy Trader 3 optimization
Config Mode turns dozens of Lazy Trader settings into controlled presets that can be iterated in Strategy Tester and then saved back into working plan cfg files.
Balanced Price Range (BPR)
BPR is the imbalance-compression model: it works with the overlap between opposite inefficiencies and lets you choose how deep into that balance zone entry should happen.
Moving Averages model
The MA model does more than “touch the fast average”: it also validates the nearest eligible fractal to the left before opening.
Classic Structure Reversal
Classic Reversal becomes relevant only when structure itself turns; it is not just a pullback model with a different stop.
Classic Structure via primary liquidity sweep
This variation opens on the first important structural violation and reads it as a sweep rather than as a full structural reversal.
Classic Structure Trend
Classic Trend participates on a pullback inside the active structure without requiring the structure direction itself to flip.
Classic Structure family
Classic Structure is the shared logic layer for three related pages: trend continuation, primary liquidity sweep, and reversal structure.
Larry-Williams model
Larry-Williams works with range extremes and supports both direct breakout continuation and return-entry logic after a raid back into the range.
Box-Fractal model
Box-Fractal uses a confirmed fractal range as the structural base for entry and stop placement rather than entering at the first raw extremum.
Automatic direction detection
This section explains the combined logic of Direction plus Start After, which is where many users actually shape the market bias of the plan.
Manual plan-x.cfg workflow
How to edit one plan-x.cfg by hand, disable linked child CFG files, and understand the main plan variables.
What Lazy Trader does
Use this page when the main question is not “which button do I press”, but “what role does Lazy Trader play in the workflow at all”.