HINN Magic Entry
Lightning-fast entries, precise risk, and full order control on the chart.
I wanted trading to be simple. Fast. Predictable.
One click to enter a trade. Risk is calculated. Partials and breakeven are set. Everything is visible and adjustable on the chart. That idea became HINN Magic Entry.
HINN Magic Entry is a powerful, convenient, fast, simple, and intuitive advisor for lightning-fast and precise entries and order placement by choosing levels directly on the chart with automatic consideration of desired risk parameters and pricing scenarios!
It's a tool for convenient control of all positions and orders, allowing you to set order placement scenarios depending on price movement. It's not a bot, it doesn't trade on its own. It automatically calculates the required lot for the selected risk, accounts for spread and a set commission, performs partial takes at specified levels, tracks price and moves the stop loss to breakeven, etc. Without any restrictions on account types and their number, deposit sizes and base currency, built to work with any broker, 100% prop-friendly.
To use Magic Entry, your broker must not restrict Expert Advisors - check this with your broker's support before purchase.
Magic Entry videos
Interface and workflow demos for Magic Entry on the chart.
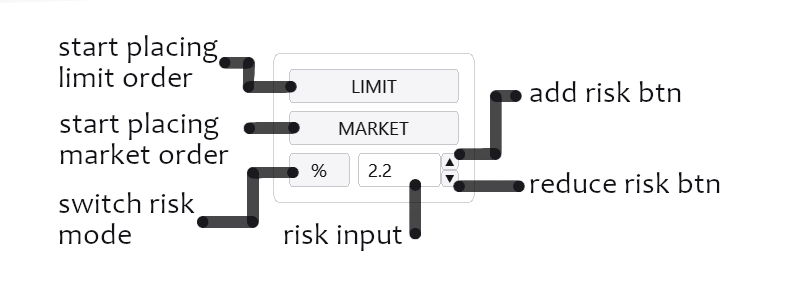
Philosophy: 1 click!
Of course, you can use preset levels or place everything manually - your choice.
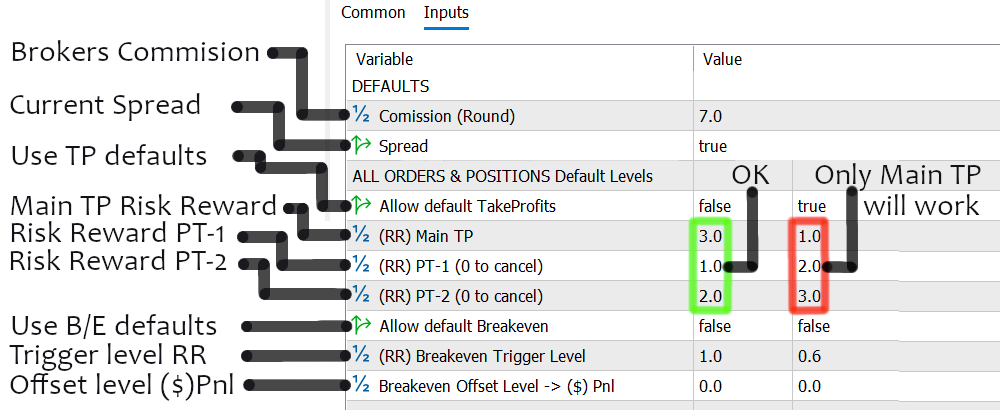
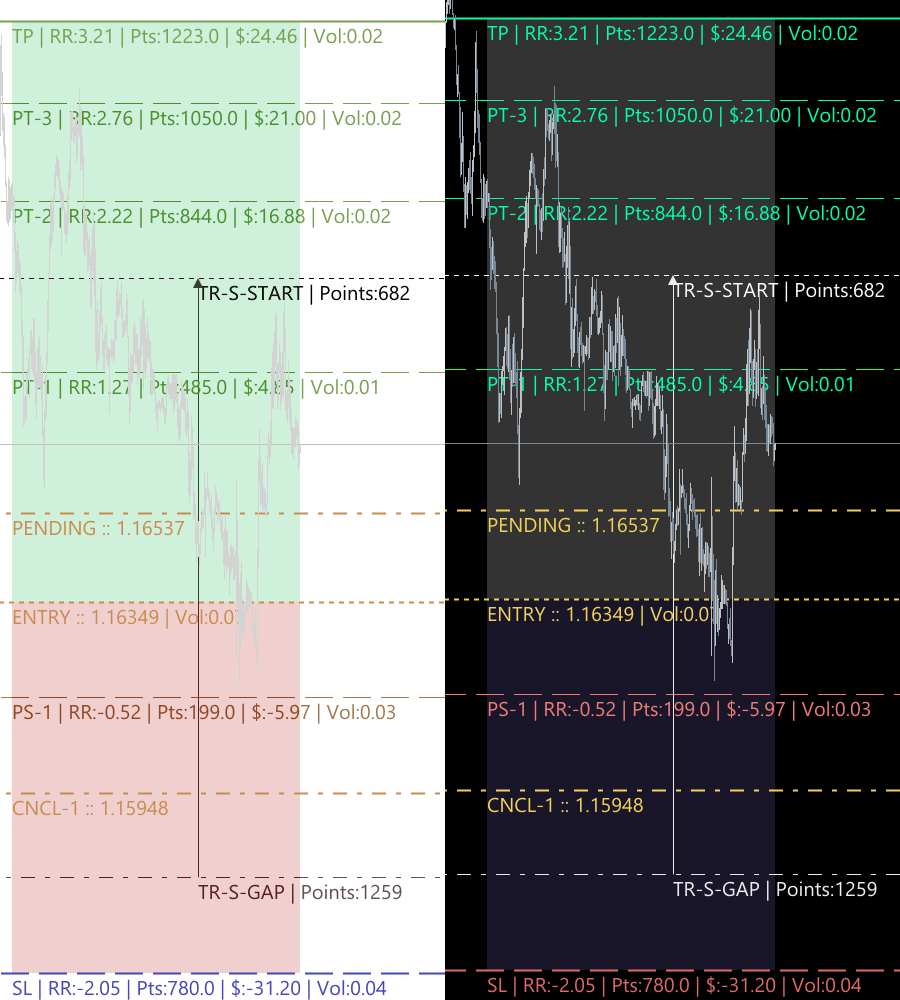
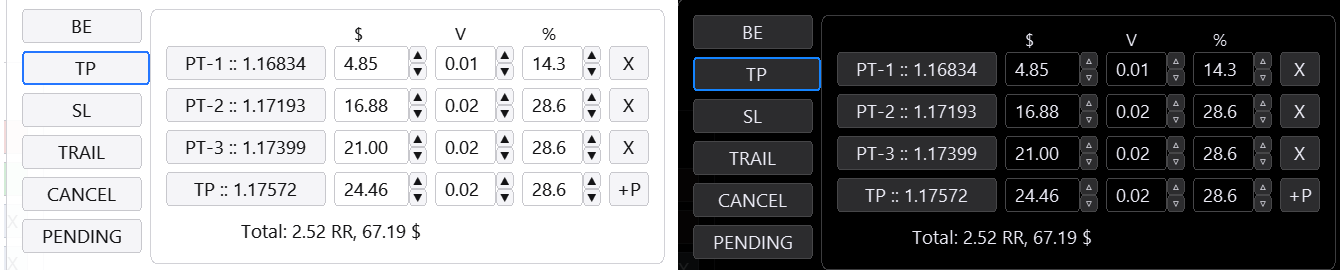
For all orders and positions placed with HINN Magic Entry, you can set default levels. This is optional and can always be turned off. These levels use the base Risk-Reward, i.e. the distance from stop loss to entry, as a coefficient for placement.
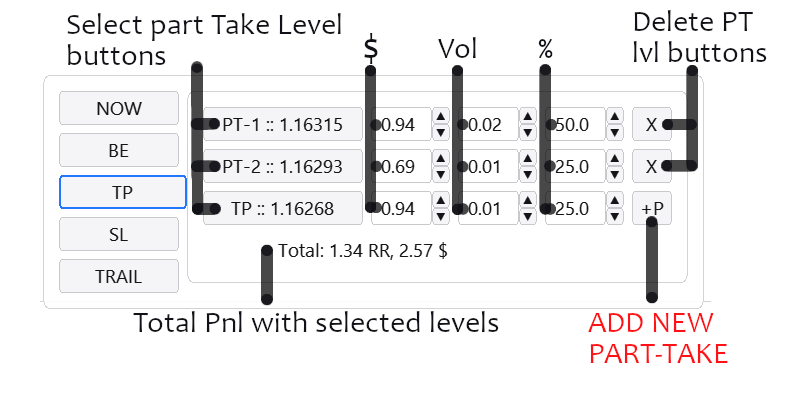
By changing values in the corresponding inputs you can achieve the desired values. The main take profit must be the farthest one; if its value is smaller than the intermediate ones, the intermediates won't trigger.

Everything you need is at hand. Nothing extra
In essence, "everything you need" is just two panels on the chart: for quick order placement and market entries, of course with predefined risk, and fast operations with positions and orders by the chart ticker.
Positions show Direction (Long or Short), Time in position, and current PNL as Risk-Reward. However, this PNL may be missing if, for example, no stop loss is set. Profitable positions are colored differently from losing ones.
Orders show the order type and entry level for already placed orders. Or they show that the order is pending (PENDING), meaning the order is not in the market and will be placed only when price reaches the specified PENDING level.
Clicking a position/order brings up extended details for that specific order/position.


Functionality for any account type and risk management is ensured by just 1 button that gives access to 4 risk control options

Of course, netting accounts are supported out of the box; the fourth mode is an emulation of netting on hedging accounts. It also allows you not to set a stop loss immediately, unlike the other modes.
- Fixed lot per trade, for example 10 lots
- Volume (lot) by specified risk in $. That is, such a volume that when stop loss is triggered the specified amount in deposit currency will be deducted, e.g. $15
- Volume (lot) by specified risk as % of deposit size. That is, such a volume that when stop loss is triggered the specified percent of the deposit will be deducted, e.g. 2.2%
- Netting mode without opening opposite trades, where an opposite trade closes the current one by lot volume
1 click to close all my positions or a part of them
CLOSE ALL menu, which opens when pressing the ALL button. The menu shows 3 inputs responsible for 3 volume selection modes: in deposit currency, in volume, and in percent of position volume. Each input, besides keyboard entry options, has its own add/subtract buttons. As with all other advisor inputs, focusing any of them lets you use keyboard arrows up/down for quick changes.
The top input ($) shows total PNL, the middle shows the total volume in the market for the ticker, the bottom shows how much % of total volume is set on average.
You can choose the desired profit amount, for example, and close it with one button. Or volume. Or the desired percent of volume.
That is, the Close All menu lets you choose the volume to close from all open positions for the ticker. Once you choose the volume, pressing CLOSE ALL executes in one click. It's definitely faster than digging into each position separately.

PNL-GUARD for drawdown control
Switching between modes using Ticker / Account and Daily / Current buttons lets you set the needed calculation mode. For example, in Account + Daily mode, when for the specified current day the PNL for all closed + open positions falls below the set threshold, all positions for the account will be closed. If Ticker + Current is selected, only open positions for the current ticker (in the current window) are checked against the limit, and only they will be closed if needed.
Closing positions via PNL-GUARD blocks the entire user interface of the current window for the number of minutes set in the advisor inputs (1). There, in the advisor inputs (2), the hour of "trading day start" is set - it's needed so PNL-GUARD knows which time range to use for account losses if Acc(Account) mode is selected. The trading server (broker) time is used, i.e. 0 in Day Start input means 00:00 server time.

There is basic multi-position control; now let's move to specific settings for each order or position.
Order and position details

It's important to understand that each position and each order is a separate entity with its own button. For example, the one that says SHORT 45m +0.2RR. Setting an intermediate partial for one position won't set it for another. Each uses its own settings. For each of them you can choose different parameters using the detail menus listed above.
- Close Now menu. Menu for closing part of a position immediately. Available only for already opened positions.
- Breakeven menu. Menu for setting the level to move the stop loss to breakeven. Note that this option can move the stop loss not only to breakeven but to any desired level.
- Take Profit menu. Menu for setting main and intermediate takes and distributing their volume.
- Stop Loss menu. Menu for setting main and intermediate stop losses and distributing their volume.
- Trailing menu. Menu for choosing trailing options for stops and takes.
- Cancel menu. Menu for choosing the level at which the order will be canceled. This menu is not available for positions.
- Pending menu. Menu for choosing a pending level, i.e. the level whose crossing will place a limit order. Choosing a pending level for a placed limit order turns it into a virtual level, removing it from the market until the pending level is reached. This menu is not available for positions.
Close now menu
The menu repeats the ALL menu functionality described above, except that NOW refers to the specific order for which it is active. This menu shows 3 inputs responsible for 3 volume selection modes: in deposit currency, in volume, and in percent of position volume. Each input, besides keyboard entry options, has its own add/subtract buttons. As with all other advisor inputs, focusing any of them lets you use keyboard arrows up/down for quick changes. The CLOSE NOW button closes the chosen volume at market.

Breakeven menu
Breakeven menu gives a bit more than just moving to breakeven: essentially it lets you move the stop loss to any level once the trigger mark is reached. It can be reused any number of times.
The idea is simple: set two levels - the trigger level you expect to reach to activate the move, and the offset level, i.e. the level to which the stop loss will be moved when the trigger level is reached.
Levels can be chosen directly on the chart via TRIGGER and OFFSET buttons or by entering desired values in the input - not price, but RR, Points, or Profit. This lets you control the process as flexibly as possible and use predefined coefficients for automation.

Intermediate partials
No extra empty fields. Add new levels by clicking +P(+Parts). Choose target volume in any way - by assigning target profit, percent of total volume, or by directly specifying the needed lot size. Select levels by clicking on the chart. Real-time display of changes and PNL calculation with partials.
The only difference between stop-loss and take-profit menus and their intermediate levels is on which side of the current price the partial close happens. That is, you can also partially reduce volume as price moves toward the stop loss if needed; you can also fix profit that way.
Neither menu has limits on the number of partials except for position volume and the broker's minimum lot. Both menus operate the maximum available volume independently; priority goes to the pricing scenario that occurs first.


Each broker has its own minimum lot requirements. For example, one broker allows splitting by 0.01 lots, another has minimum lot 1. These limitations cannot be bypassed. You can't fix, say, 0.005 on the first broker, or 0.5 on the second. The minimum partial size will correspond to the broker's requirements. If the current volume is already split into the maximum number of partials, the +P button for adding a new level will be unavailable.
Trailing stops and takes
Per-position trailing settings let you set a START level that initiates trailing and a distance at which the target level (take or stop) is held - the GAP level.
Holding take and stop at the specified GAP distance implies separate settings for take and for stop. Only the main levels are moved - main TP / main SL.

Inputs have 2 modes: Risk-reward mode, where distance is calculated from the base Risk-Reward (i.e., depending on the base stop-loss size), or Point mode, where distance is calculated in price points.
It may seem that there are many options, but in fact everything is set in two clicks thanks to a smart linkage: the gap sticks to the start, and when you change the start both levels move at once while the gap remains unchanged.
- Toggle to enable stop trailing.
- Button to select the level that must be reached before stop trailing starts.
- Button to reset the start level for stop trailing.
- Button to select the level that defines the distance to keep between price and stop loss as it moves away from the stop loss.
- Button to reset this level (4).
- Buttons to choose the number mode in inputs 7-8, which also let you set start and gap trail levels.
- Input for stop-loss trailing start level.
- Input for stop-loss trailing gap level.
- Toggle to enable take trailing.
- Button to select the level that must be reached before take trailing starts.
- Button to reset the start level for take trailing.
- Button to select the level that defines the distance to keep between price and take profit as price moves toward the take profit.
- Button to reset this level (12).
- Buttons to choose the number mode in inputs 15-16, which also let you set start and gap take trail levels.
- Input for take trailing start level.
- Input for take trailing gap level.
Pending orders and invalidation levels
The idea is to cover two main cases:
For selecting each level there is a simple menu with level buttons and a toggle for the option. It is set in one click - choose the needed levels directly on the chart.
Two CANCEL "invalidation" levels are needed to implement different scenarios and, together with the PENDING level, provide the full spectrum of possible outcomes.

Breakeven, trailing, partials, canceling limits, and monitoring pending level crossings are handled on the client side, on your PC, inside your copy of MetaTrader 5. This means your PC and terminal must be running (not in sleep or hibernation) and connected to the internet.
- Place a limit order only after a certain level on the chart is reached - PENDING
- Cancel/delete the limit order if price reaches a place where you did not plan to see it - CANCEL.
Keyboard control
Magic Entry supports hotkeys for fast entries, level selection, and quick switching between positions and orders.

Keys will work in any of the visualization modes described below, even with the UI fully trimmed, but only if the Allow using keyboard (2) toggle is enabled (true).
- ESC cancels any started action, acts as both the cancel button and the back button
- Toggle to enable or disable keyboard button operation
- TAB to switch between positions and orders
- Q to place a limit order: first click on the chart sets stop loss, second sets entry, third sets take (if default levels are not configured)
- W for market entry: first click on the chart sets stop loss, entry happens immediately after the first click, second sets take (if default levels are not configured)
- A to buy the specified lot amount in netting emulation mode N(lots)
- D to sell the specified lot amount in netting emulation mode N(lots)
- T to select the main take profit
- S to select the main stop loss
Display modes and interface element positions
Using the interface element position settings and the visibility options for different elements, you can flexibly configure the desired layout of all buttons and menus. Besides order, position, and risk type buttons, you can disable any buttons, leaving the interface as minimal as possible.

Using these toggles, you can configure any desired layout in a few clicks.
- Show or hide the standard MetaTrader take-profit and stop-loss levels
- Show or hide the buttons responsible for menu position and orientation. 2.1 - "arrow" button - position toggle. 2.2 - orientation toggle.
- Show or hide the LIMIT button
- Show or hide the MARKET button
- Show or hide the GUARD button
- Show or hide the ALL button
- Show or hide the NOW button
- Show or hide the BE button
- Show or hide the TP button
- Show or hide the SL button
- Show or hide the TRAIL button
- Show or hide the CANCEL button
- Show or hide the PENDING button
- Switch between compact and full display modes
- Theme switch
- Interface button size switch
- Switch RR display modes in line labels
- Input for the custom theme file name with user colors
Dark, light, and custom themes.
The theme switch (15) described above toggles the preset colors from dark to light, which looks like this:
Choose from two preset themes or create your own.
Use color-picker for quick visual configuration of the needed colors and shades. Create a theme file with it (for example, myTheme.mqh).
Place the created file in the MetaTrader5 terminal folder: C:\Users\USERNAME\AppData\Roaming\MetaQuotes\Terminal\...\MQL5\Files\
Switch (15) to THEME_MODE_CUSTOM.
Enter the file name in input (18): myTheme

