Lazy Trader
Config Mode and Lazy Trader 3 optimization
How admin optimization inputs, presets, Strategy Tester runs, generated plan cfg files, and model / weekday micro configs fit together.

ALERT: master on/off replaces current settings
When the Master on/off toggle is true, it replaces the current settings with values from the inputs below. Use Master TRUE only for testing in the MetaTrader Strategy Tester.
FOR DEMO VERSIONS, OPTIMIZATION IS BLOCKED BY METATRADER
This is not my preference; it is MetaQuotes policy. Optimization is available only in full product versions - paid products, or products that are free by design.
For free demos of paid products, optimization is not available for any product from MQL5.com.
Section video
If you reached Config Mode, you reached the real purpose of the Lazy Trader 3 architecture. The new advisor inputs are not there so you can manually click through dozens of switches; they exist for admin optimization, so MetaTrader can iterate combinations in the Strategy Tester and search for usable conditions on a specific asset.
The goal is not to build one universal config for every market. Lazy Trader is designed in the opposite direction: find a narrow combination of Direction, Start After, model logic, time rules, and risk layer for one asset, one weekday, and one model, then combine many such micro config files into a broader working set.
The main blocks in this workflow
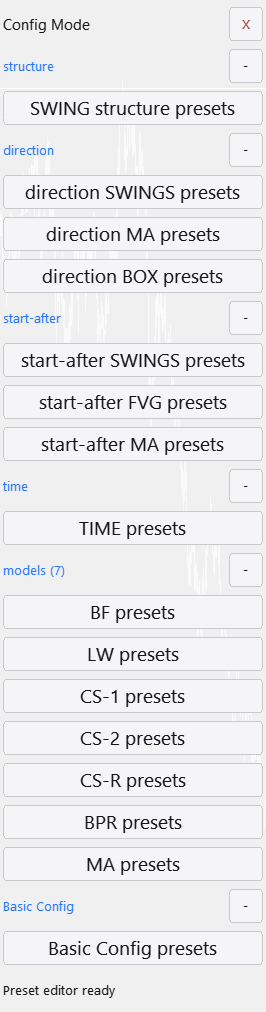
- Config Mode: the place where optimization presets are configured before they appear in tester inputs.
- advisor inputs: advisor parameters that Strategy Tester can iterate through start / stop / step values.
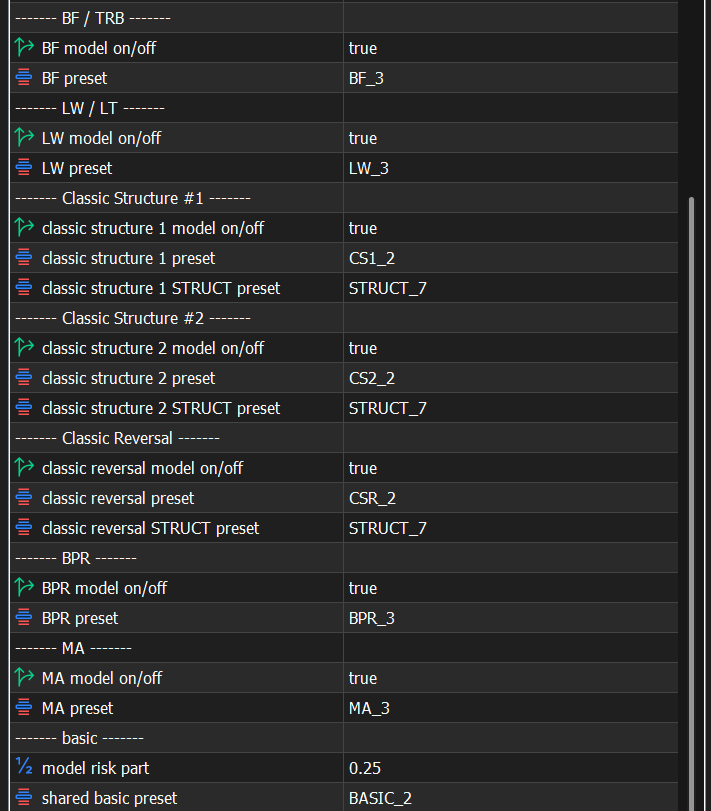
- structure preset, Direction preset, Box preset, Time preset, and Base config preset: compact bundles of settings instead of direct brute force across every UI control.
- result table: the table where each row represents one optimization pass with its selected values, profit, trades, drawdown, and other metrics.
- Generated plan cfg: the file you can move from Common/Files/ZEN/admin_cfg into MQL5/Files/ZEN/plan_cfg, load in the normal UI, and combine with other plans.
Why optimization is built around presets
- Every Lazy Trader canvas contains many internal parameters. If each button were optimized directly, the number of combinations would become unmanageable very quickly.
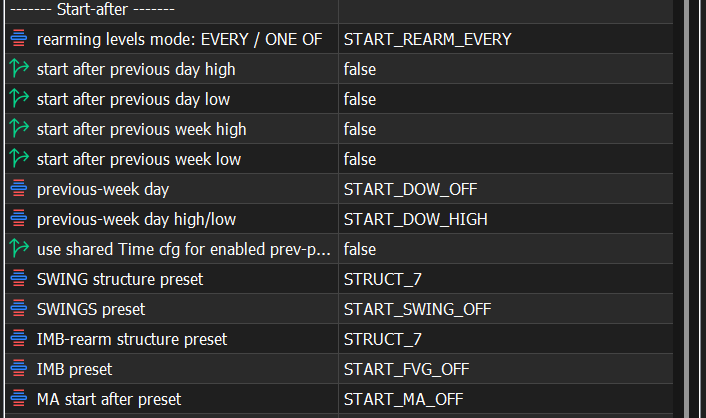
- structure preset packages several structure settings into one switch. For example, a Swing Structure set can be reused in Start After, Imp Rearm Structure, structure models, and Swing Direction.
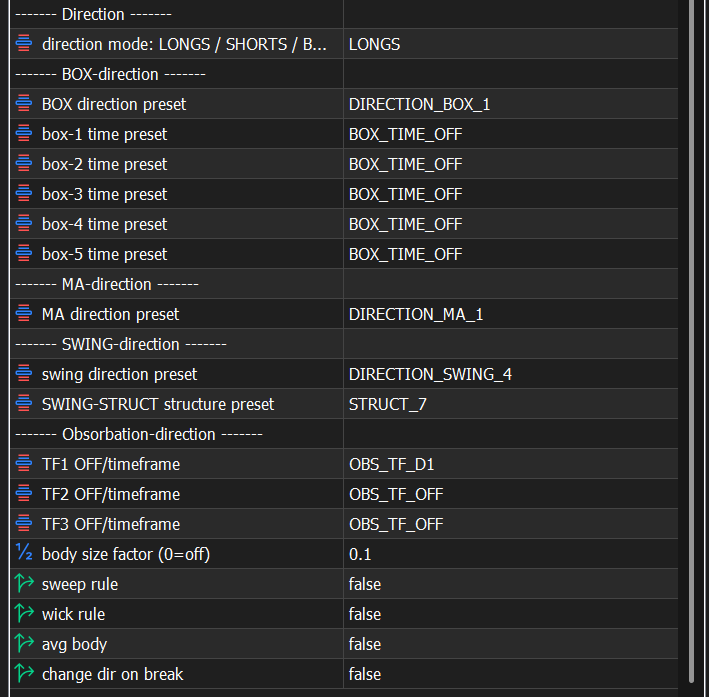
- Direction preset covers custom Direction modes: Box Direction, MA Direction, and Swing Direction. Long / Short remain simple static modes.
- Box preset is more complex than a regular preset: it can contain from one to five time boxes, and every box has its own preset page.
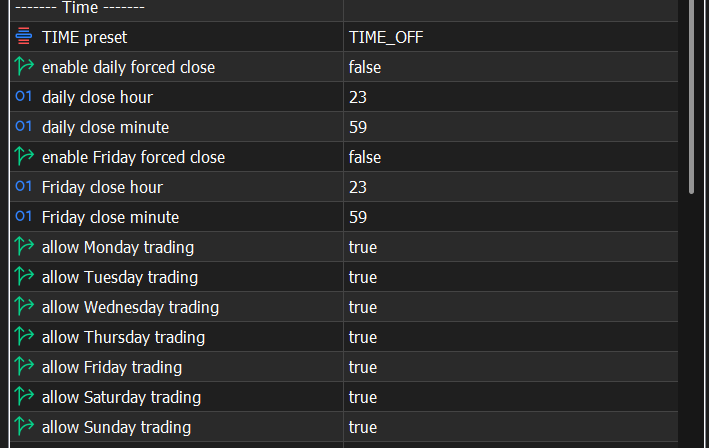
- Time preset and Base config preset also use internal pages because they contain too many parameters for one interface page.
- The model families shown in the video are Box Fractal, Larry Williams, Classic Structure 1, Classic Structure 2, Classic Structure Reversal, BPR, and MIMA. The second Classic Structure entry is left as an extra structural variation.
Warning: a preset does not save itself
Every preset you adjust must be saved separately. Built-in values are useful for quick experiments, but serious work should be saved under your own conditions.
When a preset contains pages, check every page. In Box Direction, different boxes can have different time windows, session mode, confirmation, reverse-breakout behavior, and lifetime.
Optimization starts from the Strategy Tester: select the advisor, enable optimization mode, and use the slow complete algorithm. After that, the work happens through the tester's own Inputs tab, not through the normal terminal UI.
A checkbox next to an input tells the tester to iterate values from start to stop with the selected step. For example, Swing Structure Preset from 1 to 10 with step 1 gives 10 variants. If you add an independent Imp Rearm Structure Preset and a model preset, the number of passes multiplies.
Master on/off for Admin Optimization must be true
To make optimization work through these checkboxes, enable Master on/off for Admin Optimization.
If it stays false, all your hundreds of thousands or billions of passes will use the same default plan cfg. The result chart will look like a nearly identical line of dots, and it will seem as if optimization is broken.
Warning: Strategy Tester has its own sandbox
Normal terminal inputs and Strategy Tester inputs are not the same thing. Values set in the regular UI will not affect the tester unless you set them in the tester Inputs tab.
Tester files also live in a separate environment. That is why the generated admin cfg appears in Common/Files/ZEN/admin_cfg, and for normal UI loading it must be moved into MQL5/Files/ZEN/plan_cfg.

Practical test order
- Enable Master on/off for Admin Optimization.
- Select only the inputs you actually want to iterate in this run.
- Keep only one model enabled, not all models at once.
- Select one weekday, for example Monday only.
- Choose Direction logic that matches the test: MA Direction, Box Direction, Swing Direction, or static Long / Short.
- Run optimization and wait until the table contains enough useful results.
- Choose rows by more than profit: inspect drawdown, trade count, stability, and risk fit.
Warning: one model and one weekday
The baseline recommendation from the video is to test weekdays separately and models separately: Monday alone, Tuesday alone, Wednesday alone, and so on.
The same model behaves differently across assets, weekdays, and preset groups. The Lazy Trader idea is to find the correct model / weekday pair, not to trust one broad config across the whole market.
Aggressive LTF configs are especially sensitive to volatility, and volatility differs by weekday and economic-calendar context.
Warning: pass count grows exponentially
The more history, weekdays, and checked inputs you add, the longer the calculation gets. 300,000, 500,000, or 1,000,000 passes are realistic for this workflow.
MQL Cloud Network can speed this up, but it spends money from your MQL5 account balance. A small run may be barely noticeable; million-scale and year-scale runs can become very noticeable.
Estimate the budget before enabling cloud agents, and do not launch accidental billions or trillions of combinations without understanding the cost.
How to read the result table
- Every row in the result table is one optimization pass with its own selected input values.
- Right-clicking the table lets you add or remove statistics columns.
- Evaluate the row as a whole: profit, drawdown, trades, expected payoff / accepted payoff, stability, and whether the row fits your risk profile.
- A point on the optimization chart corresponds to a table row, so the row is more important than the visual point without context.
How to turn one result row into a plan cfg
- Before selecting a row, enable Save generated admin plan cfg and midi.
- Double-click the row with the result you want. Once the run starts, it can be stopped immediately; the file has already been generated.
- Open the tester Data Folder and find the file in Common/Files/ZEN/admin_cfg. Its generated name may look like a timestamp or random symbols.
- Rename the file to a readable suffix, for example 123 or 234.
- Move it into the normal terminal folder: MQL5/Files/ZEN/plan_cfg.
- In the Lazy Trader UI, add a plan, type the suffix, press Load, and resave the plan after loading if you see the name change.
Warning: without Save generated there is no file
To receive a loadable plan cfg, Save generated admin plan cfg and midi must be enabled before you double-click the result row.
If the file appears with a temporary name, that is normal. The important part is to move the correct file from the tester sandbox to the normal terminal folder and load it by the new suffix.
After the first file, repeat the same procedure for another weekday or another model. For example, one weekday config works on Monday and another works on Tuesday. In the UI, both plan cfg files can be added as separate plans.
With 6 models and 5 trading weekdays, you get roughly 30 plans in just one iteration of one broader algorithm. More models, weekdays, or Direction variants increase the number of micro configs.
Warning: risks stack
When many plans work at the same time, profit and accepted payoff can stack, but so can drawdown, trade risk, margin load, and broker limits.
Do not evaluate each plan cfg in isolation while forgetting that several models can open on the same day.
Before live use, estimate the combined drawdown of all active plans and check whether the set fits your broker conditions.
The purpose of Lazy Trader 3 is to test everything that can reasonably be tested individually: one model, one weekday, one asset, and a narrow set of Direction, structure, imbalance, time, and risk conditions.
This is the opposite of the usual teaching that one strategy should work on every asset at all times. In this architecture, it is more valuable to discover dozens or hundreds of narrow conditions where a specific model drawdowns less and produces a more predictable result.
The Lazy Trader 2.45 example in the video illustrates the same idea: define an expected drawdown and profit window first, then compare the live or test result against that window. Version 3 gives you a wider toolset for that selection, but it does not remove the need for testing.
Warning: asset and broker context matter
A config found on US500, GBP, or any other instrument should not be moved to another asset with the expectation of identical behavior.
Indices often show stronger session behavior because of liquidity inflows, especially around the New York session, but that still needs historical validation.
When sharing results in Discord, Telegram, or for review, include the asset, broker, and test conditions.
Minimum testing discipline
- For serious conclusions, use a long enough history window, not two weeks. The video uses about three years as a practical reference: less is too little, more is usually unnecessary.
- Do not leave extra true / false conditions enabled by habit. Check PDH, PDL, PVH, PDL, and similar filters before launching a multi-day test.
- Save discovered plan files under readable names and keep the mapping: asset, broker, model, weekday, date range, and key preset values.
- Compare not only maximum profit, but also whether drawdowns are predictable and whether risk is distributed logically.
Warning: practical questions need the config
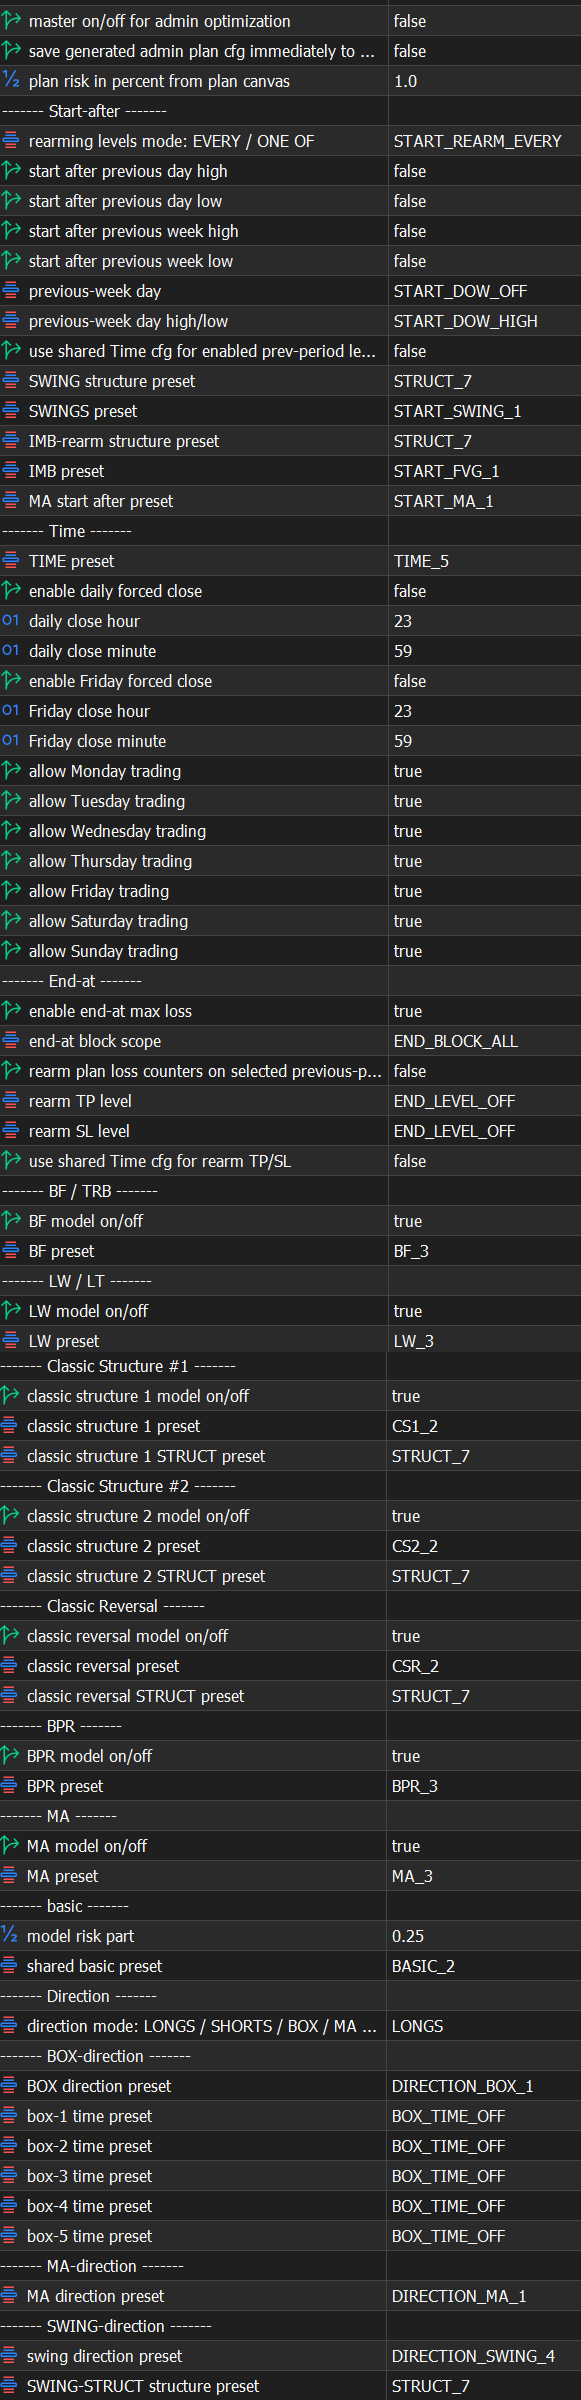
A single plan cfg can contain about 570 parameters, and many of them can differ.
If the question is theoretical, the principle can be discussed. If the question is practical, such as why your setup behaves differently, the config is required. Without it, there is no way to know which values were actually used.
Not financial advice
This material explains the tool and the optimization workflow. It is not a signal, an income promise, or a guarantee of results.
Use the product for its intended purpose, test hypotheses systematically, and keep risk inside limits you can actually tolerate.
Other Lazy Trader sections
Balanced Price Range (BPR)
BPR is the imbalance-compression model: it works with the overlap between opposite inefficiencies and lets you choose how deep into that balance zone entry should happen.
Moving Averages model
The MA model does more than “touch the fast average”: it also validates the nearest eligible fractal to the left before opening.
Classic Structure Reversal
Classic Reversal becomes relevant only when structure itself turns; it is not just a pullback model with a different stop.
Classic Structure via primary liquidity sweep
This variation opens on the first important structural violation and reads it as a sweep rather than as a full structural reversal.
Classic Structure Trend
Classic Trend participates on a pullback inside the active structure without requiring the structure direction itself to flip.
Classic Structure family
Classic Structure is the shared logic layer for three related pages: trend continuation, primary liquidity sweep, and reversal structure.
Larry-Williams model
Larry-Williams works with range extremes and supports both direct breakout continuation and return-entry logic after a raid back into the range.
Box-Fractal model
Box-Fractal uses a confirmed fractal range as the structural base for entry and stop placement rather than entering at the first raw extremum.
Base config
Base config is the shared risk and management layer that sits under each model and keeps model-specific logic from drifting into risk chaos.
Position Manager
Position Manager gives each open trade its own chart-level button and lets you adjust takes, breakeven, stop-loss, and level sizing without leaving the Lazy Trader workflow.
STATUS canvas
Status canvas merges Direction, Start After, End At, Time, and Models into one live state map, so you can see what is aligned, what is still pending, and why the plan is running or waiting.
MODELS menu
Models are the executable entry modules inside the plan, and the menu is built to let many different model types coexist under one scenario.
START AFTER menu
Start After does not pick the side of the trade; it defines what must happen before the plan is allowed to begin evaluating entries at all.
DIRECTION menu
Direction defines whether the plan is fixed long-only, fixed short-only, or dynamically biased through box, MA, or swing logic.
Automatic direction detection
This section explains the combined logic of Direction plus Start After, which is where many users actually shape the market bias of the plan.
TIME menu
TIME is where session logic lives: windows, overnights, weekday permissions, daily close, Friday close, and broker-specific timing constraints.
END AT menu
END AT defines when the plan stops looking for new positions, which is different from instantly flattening every already-open trade.
Manual plan-x.cfg workflow
How to edit one plan-x.cfg by hand, disable linked child CFG files, and understand the main plan variables.
PLAN menu
PLAN is the root canvas: it is where risk, entry/stop/take, and the links to every other menu become one executable scenario.
What Lazy Trader does
Use this page when the main question is not “which button do I press”, but “what role does Lazy Trader play in the workflow at all”.